GUIDES
viewfinder apps
A viewfinder app provides the most complete experience for the VZ-6617. We recommend Second View for iOS or Magic Film Viewfinder for Android.
Second View was used extensively in pre-production camera testing. While it can be used for any camera, we’ve worked with the developer to evaluate and integrate some key features that enhance the VZ-6617 shooting experience:
Light meter readings for accurate exposure
Library of film stocks to automatically set ISO and long exposure reciprocity
Built-in reciprocity timer that automatically activates when long exposures are detected
Distance readings to make zone focusing more accurate
Parallax correction to make your framing accurate based on distance readings and your phone’s position
Film advance calculator that tells you what frame number to advance toward next given your current frame size and number.
Customizable step-by-step shooting guide to make sure you complete everything needed for your exposure.
Please note, we are not directly involved with the development these apps and all questions regarding their use should be sent directly to their respective developers.
GENERAL WORKFLOW
While all large format lenses are slightly different in their operation, the following general workflow will take you through loading film, making your exposures, and unloading film.
Loading Film (see video below)
Remove the film back from the camera.
Release the spool lock on the take-up spool side (right) using the sliding release button on the bottom of the camera.
Install an empty film spool by inserting it with the top end first and rotating the wind knob until the spool drops in.
Engage the spool lock by pushing it in on the bottom of the camera. It will click into place when fully engaged.
Release the spool lock on the film-spool side (left) using the sliding release button on the bottom of the camera.
Install your film spool with the film leader to the right and the backing paper facing you. Insert the spool with the top end first and rotating the wind knob until the spool drops in.
Engage the spool lock by pushing it in on the bottom of the camera. It will click into place when fully engaged.
Pull the film leader across the film gate and insert into the slot in the take-up spool.
Hold the leader in the take-up spool and turn the wind knob counter-clockwise to wind on the film. After about 1.5 to 2 turns, it will be held in place.
Continue winding the take-up spool until the starting arrow is aligned with the frame size display window at the center of the film gate.
Reattach the film back. Your film is now loaded.
Making an Exposure
If your lens has a preview lever, ensure that it is in the closed position to avoid exposing your film unintentionally.
Remove the dark slide if it is inserted.
Set your frame size by rotating the adjustment knob until the desired size is shown in the frame size display window.
Slide open the frame number viewing window that corresponds to your selected frame size so that you can see the frame numbers on the backing paper of the film through the red window (see “Frame Number Windows” below).
Wind the take-up spool wind knob counter-clockwise to advance the film to the correct frame number for your selected frame size (see “Frame Number Advance Guide” below).
Slide the frame number viewing window closed.
Set the aperture on your lens.
Set the shutter speed on your lens.
Set the focus using the focusing ring.
Cock the shutter on your lens.
Frame your shot and fire the shutter using the shutter release lever on the lens or cable release attached to the shutter release lever.
Unloading Film
Slide open any of the frame number viewing windows.
Turn the take-up wind knob counter-clockwise and watch through the frame number viewing window until you see the end of the film pass across it.
Continue winding until you feel the tension release. This means the end of the film is completely past the film gate.
Remove the film back from the camera.
Release the spool lock on the take-up spool side (right) using the sliding release button on the bottom of the camera.
Remove your exposed film spool by pulling up from the bottom of the spool to remove it from the camera body.
Seal your film spool with the adhesive strip on the backing paper.
Your film is now unloaded and sealed. Engage the spool lock by pushing it in on the bottom of the camera. It will click into place when fully engaged.
Reattach the film back.
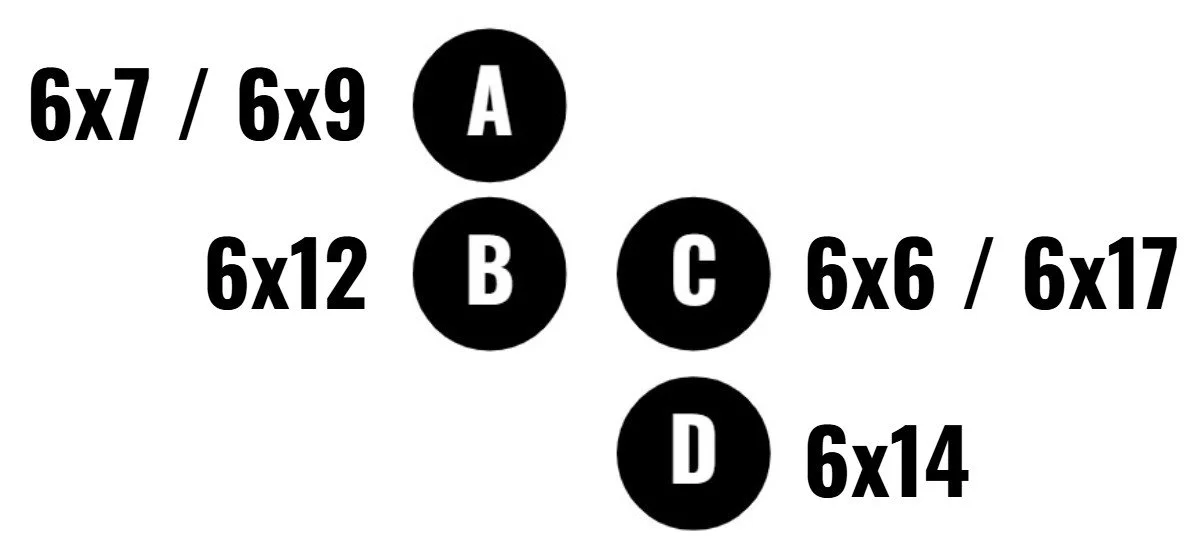
FRAME number windows
The windows on the back of the camera correspond to the following frame sizes:
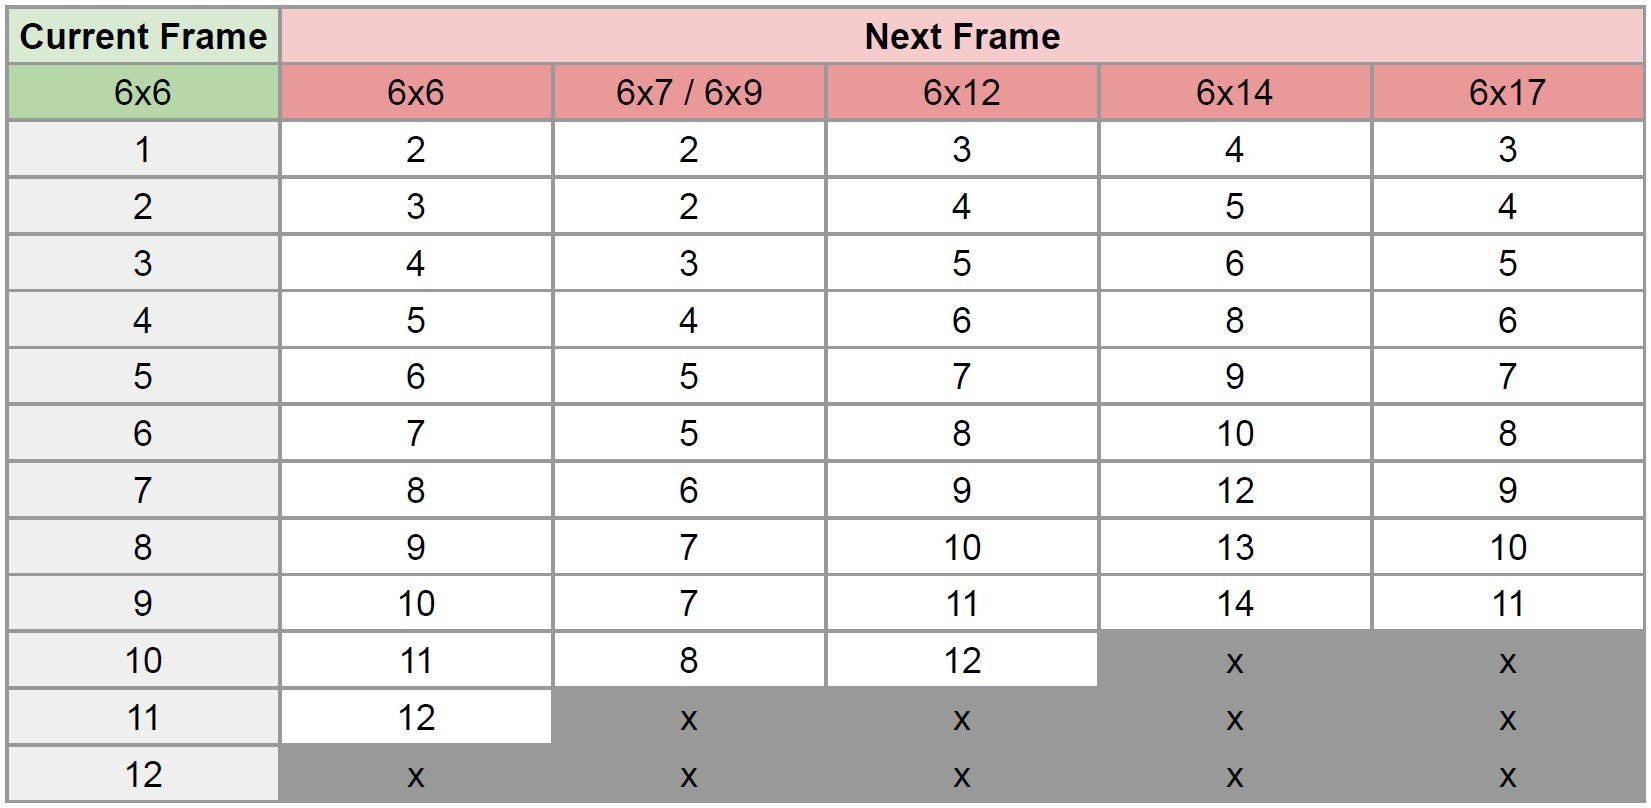
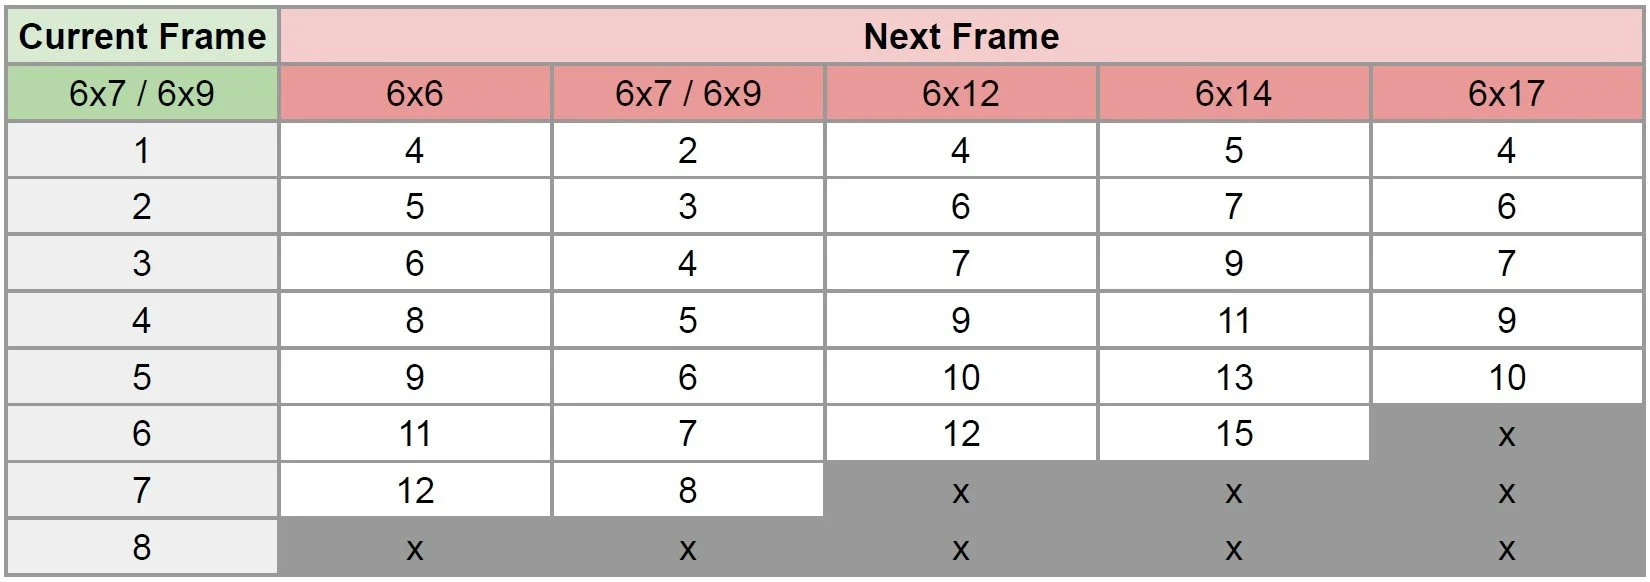
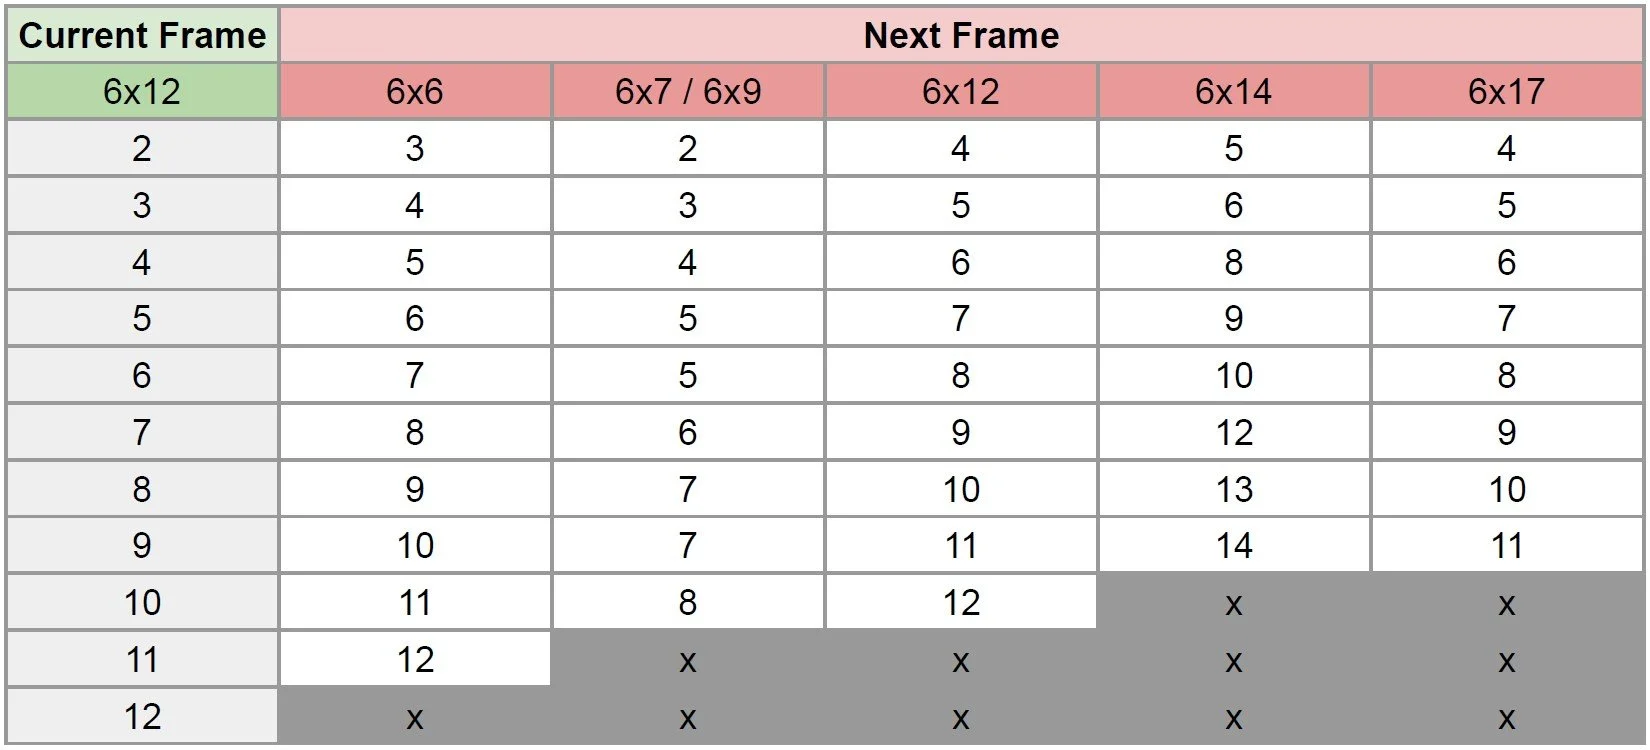
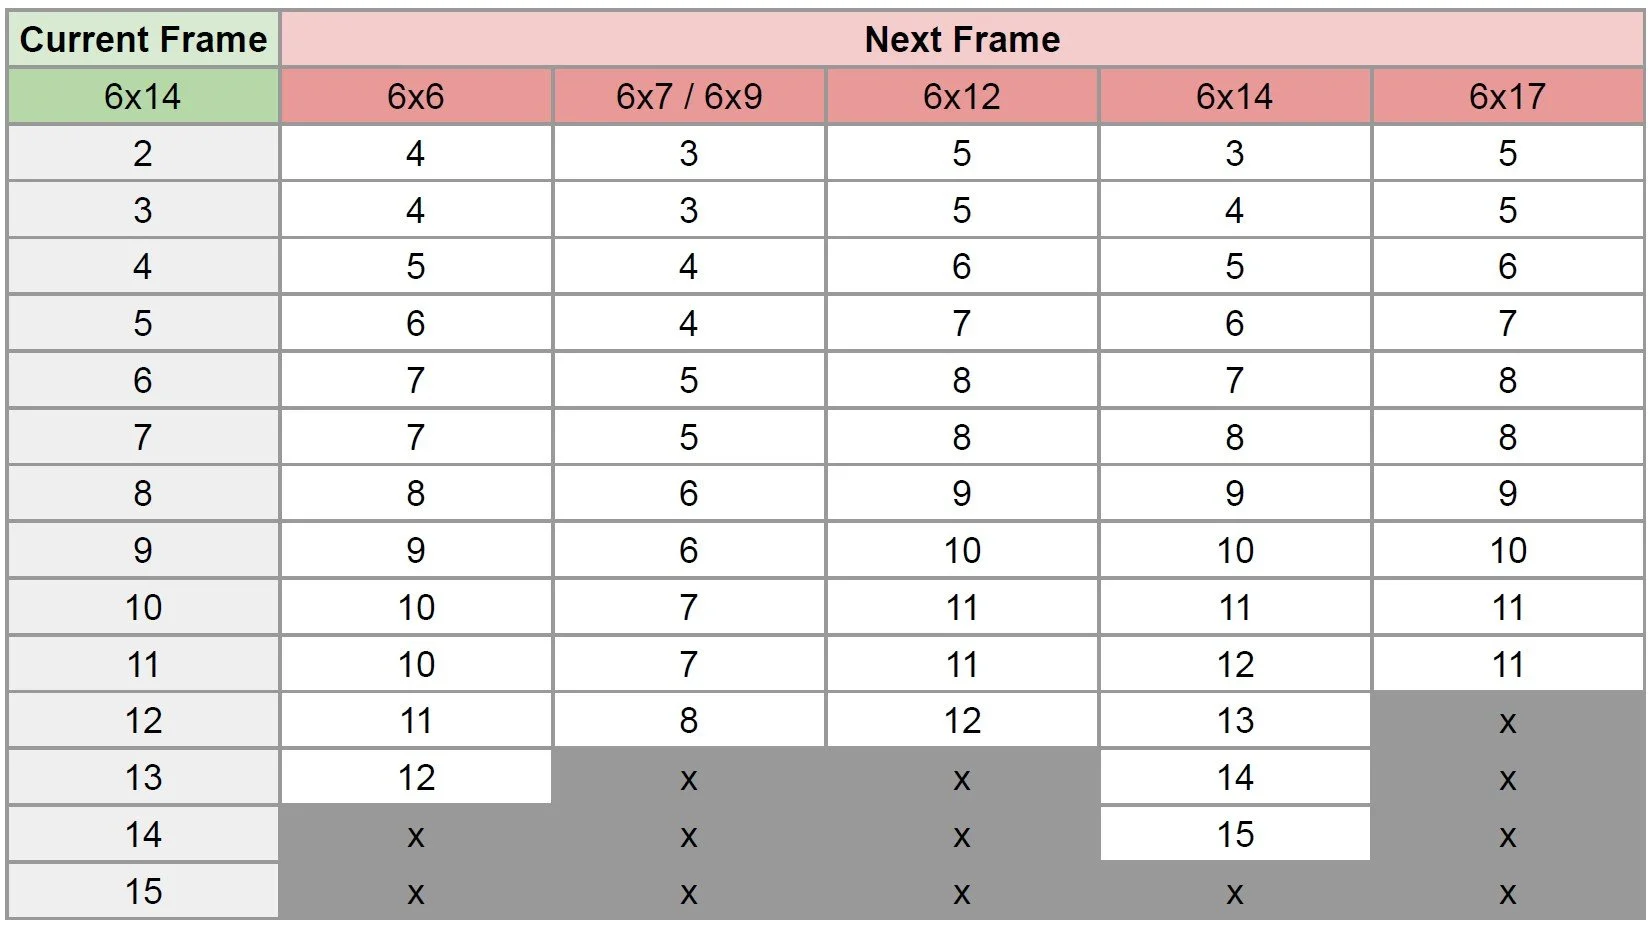
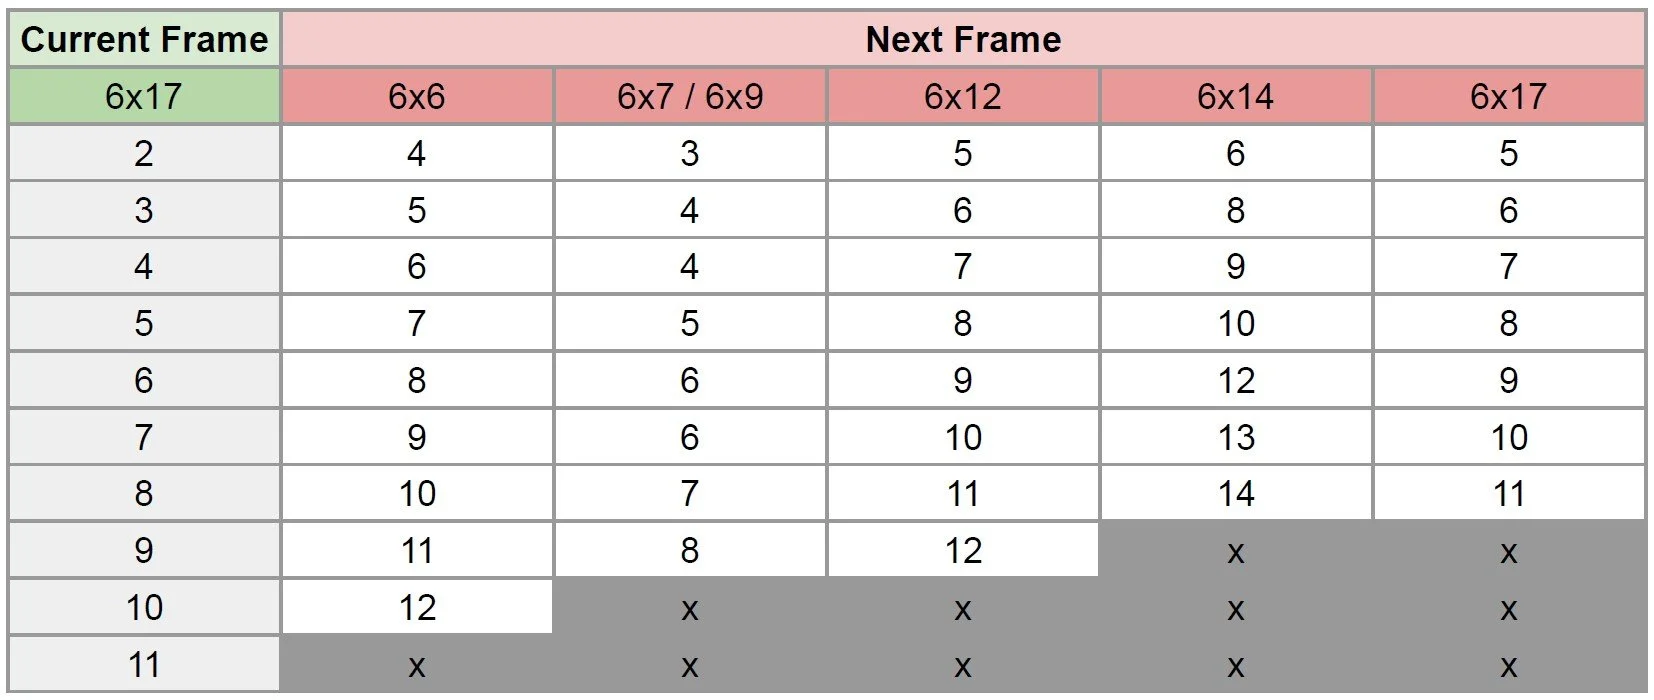
FRAME NUMBER ADVANCE GUIDE
When advancing your film or mixing multiple frame sizes, refer to the tables below or download the guide as a PDF here.